
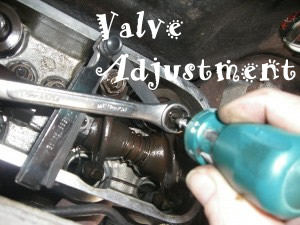
Here’s a job I had trouble understanding when I first got Dusty. Making sure the VW valve adjustment of each valve was correct. One that needs checking every 3000 miles. The problem is, there are so many different methods documented and not enough pictures, so I have tried to put lots of photographs. Even if you don’t choose this method, it may help you to understand the principle of all the methods.
What’s the Point?
As I understand it, the gap you are measuring and setting on the tappets, shouldn’t exist when the engine is warm. Everything expands and that’s why you set the gap when the engine is STONE COLD. As the engine warms up, the gap you have set disappears.
Where Do I Start?
The consensus is the gap should be 0.15mm on exhaust and inlet valves. With Both rocker covers removed you will find 4 valves on each side , inside each rocker you have :
- 2 inlet valves
- 2 exhaust valves
You can go to the length of figuring out which valve is inlet and which is exhaust but for the setting of these valves, it doesn’t really matter because they are all set to the same gap.
You have to prise the spring bails down to remove the rocker covers and have your valves exposed.
Position the Engine for Your First VW Valve Adjustment
Get the engine in the correct position to start. We are going to turn the engine so certain valves are shut. The valves that are shut are the ones that require the gap (valve clearance). How do we know which ones are shut and which ones are open? The way I have found to figure this out means popping off the distributor cap. Before you do this, figure out which HT lead goes to the number 1 cylinder. On the type 4 engine, the numbers are written on the tinware. If your campervan is right-hand drive then the one nearest the driver’s seat is number 1.
We want to get the rotor arm pointing towards this HT lead position on the cap. Here’s a photo of mine in that very position. Don’t think that yours will be in the same position. It appears that some distributors end up different ways round in the engine over the years so basically you need to make sure your rotor is pointing to YOUR number 1!

How do you actually turn the engine to move the rotor to the position you want? Well, I used to take off the fan cover and then turn the big nut underneath it. I read somewhere else that if you turn the alternator pulley nut whilst putting a bit of pressure on the fan belt with your thumb to stop it slipping, then the engine will turn. Make sure you are not in gear and the keys are out of the ignition.


You want to line the engine up to TDC (Top dead centre) which is easy on the type 4 because you have a timing strip.

Now My Engine is In Position, Which Valve Clearance Do I Adjust?
When the engine is at TDC your rotor arm will either be pointing to number 1 or number 3 cylinder. This is because each revolution only completes half the cycle of the engine. If you are at number 3, don’t worry, just start gapping the opposite valves. If your campervan is left-hand drive and your rotor is pointing at number 1, the first 3 valves on the driver’s side are ready to be measured and adjusted, and so is the 8th valve on the passenger side. When I say the first three valves, count from the front of the campervan.
A Diagram to Help
Here’s a quick diagram: Rotor pointing at number 1, The valves we will be adjusting are in blue.
Drivers side: back of the van <—– 0 0 0 0–——>Front of van 4 3 2 1
Passenger side: back of the van<—– 0 0 0 0——->Front of van 8 7 6 5
Time To Adjust
You will notice that the valves and rockers highlighted in blue will most probably wobble a bit. They will tap as you rock them. The others will be part way through their cycle, so there should be no wobble.
Pop a feeler gauge (0.15mm) in between the rocker and the valve as seen in the picture The 0.15mm gauge should slip in-between the rocker and the valve with a stiffish motion. A little drag should be felt when sliding in and out. If you could get the next size feeler in then the gap is too big. If you can’t get the gauge in then obviously the gap is too small.

Keep a note of any that need adjusting for future use. If you repeatedly have to adjust a certain valve a lot because the gap keeps shrinking, there is a strong possibility that the valve is stretching. This is your camper’s little way of saying “my valve is gonna break!”.
If the gap is too big or small then you need to adjust the gap (valve clearance). This is done by loosening the nut around the screw and then turning the screw clockwise or anti-clockwise depending on whether your gap is too big or small. You can leave the feeler gauge in place while you do this, so you know when you have that slight drag.

An Extra Pair of Hands
The technique to complete the VW valve adjustment is quite hard to grasp initially. The tricky part of holding the screw exactly where it is while tightening up the nut. You want to try doing this whilst taking a picture with your camera. You will know what tool juggling is all about! See the picture below: Check the gap again once tightened. If you have let the screw move whilst tightening the nut you may have changed the gap! Repeat this procedure on all the closed valves we talked about.
Once done, rotate the pulley 360 degrees. The timing mark needs to move around and back to TDC (Top Dead Centre). Your rotor will now be pointing at number 3 HT lead. Remember your number 3 may be in a different position to mine. Generally, the rotor will be pointing opposite to what it was. Here’s a quick diagram: Rotor pointing at number 3, The valve clearances we will be adjusting are in blue
Drivers side: back of the van <—– 0 0 0 0–——>Front of van 4 3 2 1
Passenger side: back of the van<—– 0 0 0 0——->Front of van 8 7 6 5

repeat the procedure of checking and adjusting the other valves and you are ready to reassemble the rockers.
Almost Done, Put it Back Together
Everyone recommends changing the cork gaskets every time you check and adjust the valves. This is your only hope of getting an oil-tight seal on the rocker covers. One of mine always has a little drip on it, I hope yours are a better fit!) Many folks also recommend greasing the gaskets to help with the seal so here is what I do:
Clean the inside of the rocker covers with a rag. Put a thin smear of grease around the rim where the gasket sits. See pic below.


Put on the cork gasket and grease the top of the gasket too, see pic:

Clean the head where the rocker cover sits , see pic:

Put the rocker cover onto the head. Try to put the bottom on first and then the top. This stops the whole rocker sliding upwards when you push the bail spring up. You need the gasket to stay put and be in the right position. HEY PRESTO you have completed your VW valve adjustment with no leaks!

Your van will be running sweet as a nut. The question is can you afford to run it with the current petrol prices. Why not convert your VW to run on LPG!
Zempire Evo TM V2 Tent – Don’t buy an awning!
VW Valve Adjustment on a Type 2.

The Solar Hot Tub

RV Solar Panels, 100 Watts is Plenty

Refillable Propane Tank by Gaslow
One thought on “VW Valve Adjustment on a Type 2.”